Permissions: Cat1
Accessing Batch Import/Export #
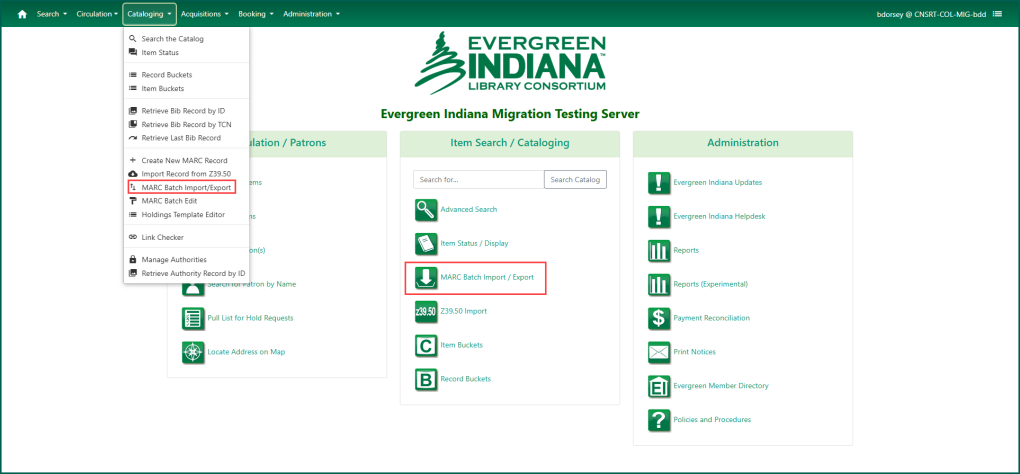
To access the MARC Batch Import/Export tool, sometimes known as Vandelay, click on the MARC Batch Import/Export icon on the portal page or go to the Cataloging menu select MARC Batch Import/Export.
The MARC Batch Import/Export module will open with the Import tab open.
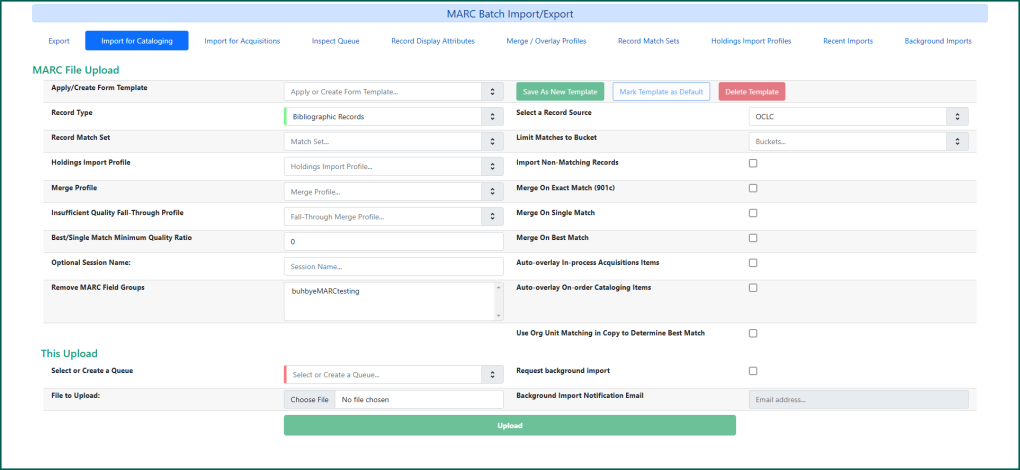
NOTE: Most of the tabs options that are listed are pre-set at the consortium level. The only tabs you will normally access are Export, Import for Cataloging, Inspect Queue, and Recent Imports.
Importing Records #
The drop-down list offers the choice of Bibliographic, Authority, and Acquisitions records. Bibliographic Records is selected by default.
NOTE: Please choose only Bibliographic Records. Procedures for importing Authority and Acquisitions records will be established in the future when the need arises.
Create a Queue #
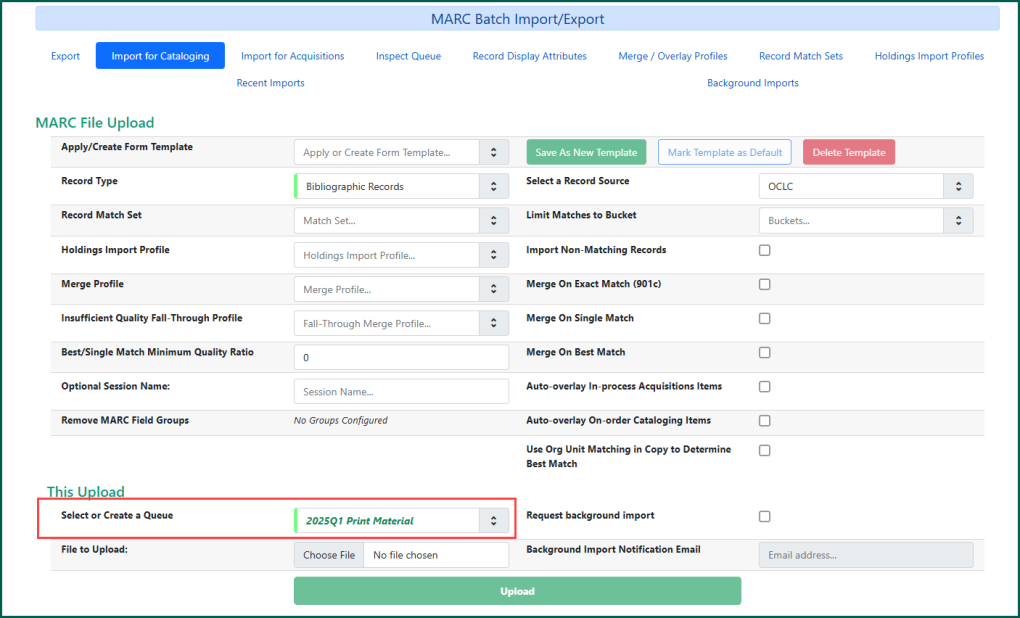
To import a batch of bibliographic records, first you will choose or create your queue. This is required in order to use the Importer. To create a queue, simply type a name for the queue in the Select or Create a Queue field. Or, if you have previously created a queue and would like to add the records to that queue, you can select it from the drop-down list.
Record Match Set #
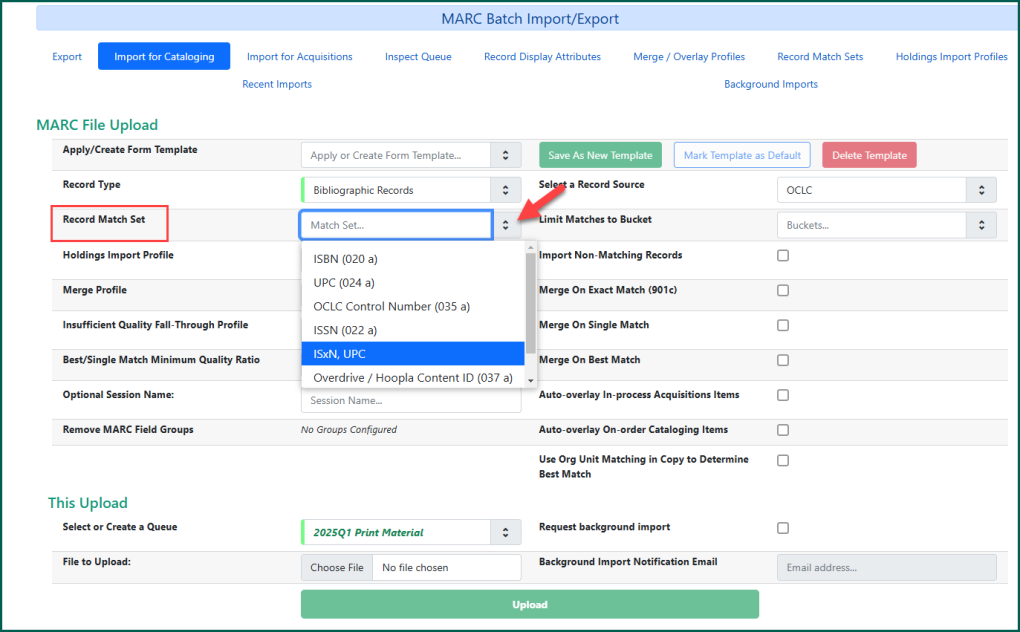
After creating or adding to a queue, it is necessary to select a Record Match Set. The match set that will be used most frequently is ISxN, UPC, which will look for records that are already in the catalog that have the same ISBN, ISSN, or UPC that the records in the upload queue do.
Merge Profile #
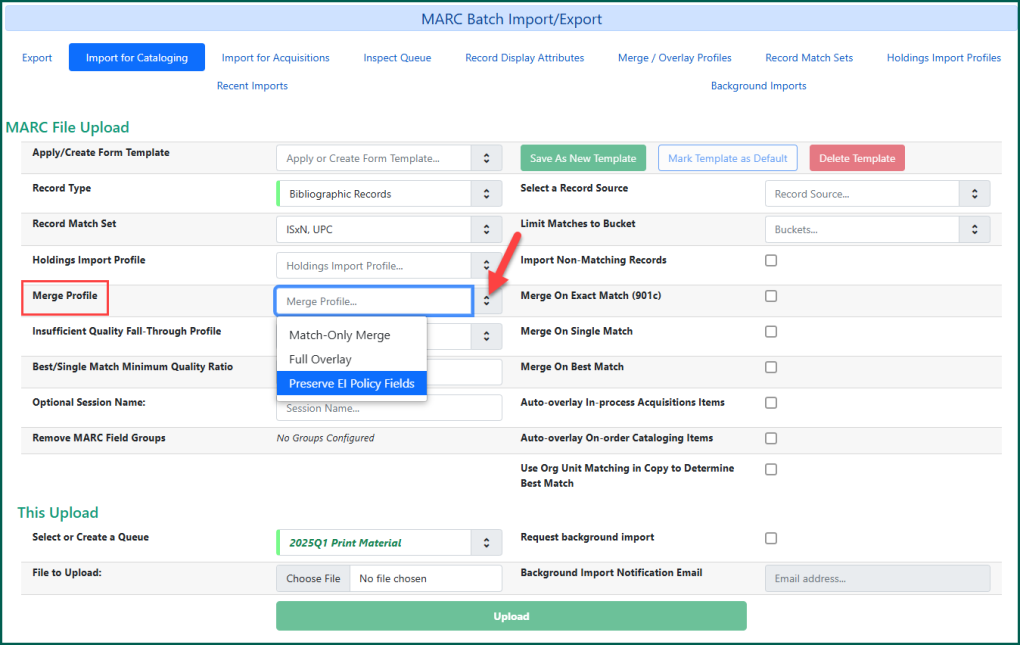
A merge profile (aka merge/overlay profile) will use pre-determined specifications used to compare an incoming record with one that may already exist in the catalog. They will define which fields should be replaced, which should be preserved, and which should be added to the record.
When importing records into Evergreen Indiana, it is recommended to use the Preserve EI Policy Fields merge/overlay profile. It is set to:
- Remove any existing 905 fields
- Preserve the 490, 500, 505, 520, 521, 526, 538, 546, 700, 710, 730, 800, 810, 830
Select a Record Source #
Importing MARC Records with Holdings #
The MARC Batch Importer/Exporter allows holdings to be imported with MARC records if the holdings information is appropriately coded in the records you are importing.
Holdings Import Profile #
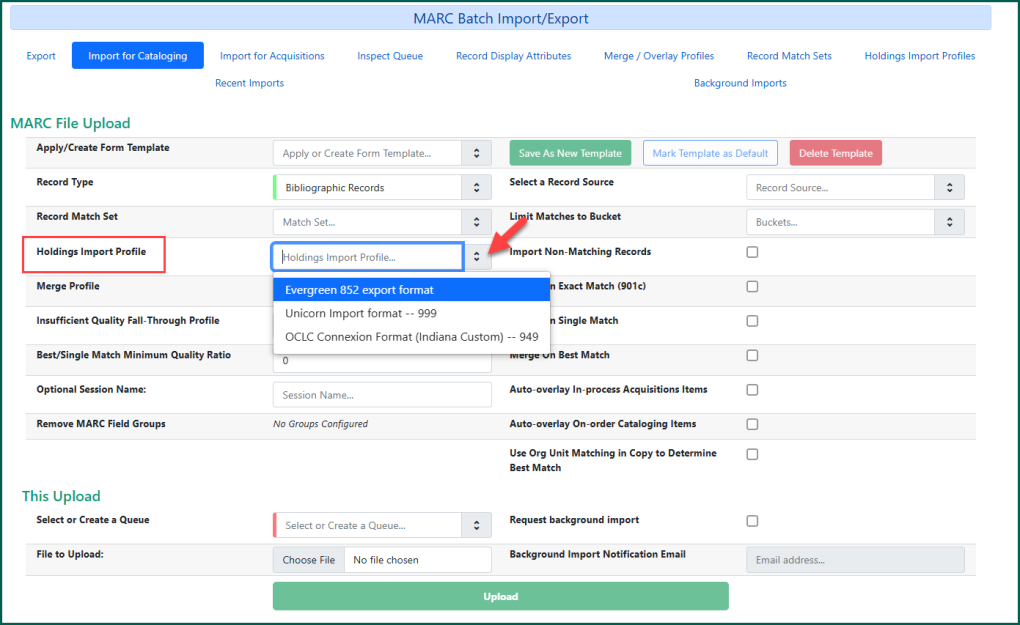
The Holdings Import Profile pre-sets which subfields in the specified tag will house which holding data. Here is an example of the layout of your holdings data using the Evergreen 852 Export Format profile:
=852 \\$bSPNCR-ROC$bSPNCR-ROC$jFIC MAA$zAvailable$cAdult Fiction$xcirculating$xnonreference$xholdable$y15.99$p99999123456123$gbook
Select the appropriate Holdings Import Profile from the drop down.
#
Insufficient Quality Fall-Through Profile #
This field enables you to indicate that if the inbound record does not meet the configured quality standards, then you may still import the record using an alternate merge profile. It enables you to indicate that if the inbound record does not meet the configured quality standards, then you may still import the record using an alternate merge profile.
Optional Session Name #
You can name your session here and it will appear next to the upload time in the Recent Imports screen.
Ignore Remove MARC Field Groups. There are none configured at this time.
There are several options on the Select a Record Source drop-down list.
The default record source is Generic, but you may choose the appropriate record source from the list. If your record source does not appear in the list, choose “System Local”.

Import Settings #
Limit Matches to Bucket
Import Non-Matching Records will bypass the queue and import the records directly into the catalog.

Merge On Exact Match (901c) should not be used for importing new records. This function allows you to re-import records you have exported to do mass edits.
Merge On Single Match merges existing records in the catalog with any records in your batch based on ISBN or TCN.
NOTE: This function will replace the existing record with the record you are importing unless you select a Merge Profile. Please don’t do this unless you’ve compared the records in the catalog with the records you are importing and you are sure the records match and your records are equal or better in quality than the existing records.
TIP: If you are not importing your records with holdings attached or replacing existing records in the catalog to do record clean-up, you should not merge your records. The records with matches will not be imported, and you can simply attach your holdings to the existing record in the catalog.
Automated Behaviors for Import Queues #
Auto-overlay In-process Acquisitions Items, Auto-overlay On-order Cataloging Items, and Use Org Unit Matching in Copy to Determine Best Match
Apply/Create Form Template #
If you regularly import records in batches, it might be useful to create a template with the most common import settings selected.
Once all of the appropriate options have been selected, enter a name for your template and click Save As New Template. You may also click Mark Template as Default so it will automatically load upon accessing the Batch Import/Export tool.

File Selection and Upload #
Once all of the appropriate drop-down lists and checkboxes have been completed, it is necessary to choose a file of the records to be uploaded. The file can come from various sources. It should be a record or a set of records that you have saved in MARC format. It may come from an open online catalog (such as Prospector), from a vendor (such as Baker & Taylor), or from a Bibliographic record
To find the file of records to be uploaded, click the Choose File button.
Your file explorer will open so that you can find and select the correct file.
When you have selected the file that you need, click the Open button in the small window. The small window will close, and your file should be displayed in the File to Upload field:

NOTE: It is important to check the catalog for the items in your batch before uploading your records, just as when you import via Z39.50, to prevent duplicates.
TIP: While you can theoretically import very large batches, the more records you have in your import file, the longer it will take to import. Batches that are too large may stall out and fail to import. You may also find that batches import more quickly at times when the system is not as busy.
Click the Upload button. While the records are being processed, the following screen will be displayed, with three different progress bars.

NOTE: Sometimes at this point, the screen will freeze, and it will appear that your items have not been imported. If you have waited a few minutes and nothing appears to be happening, close the batch importer and re-open it. You will likely find that the records now appear in your import queue. To view the import queue, click on Inspect Queue once you’ve opened the batch importer/exporter. See Inspect Queue below for more information.
When the records have loaded, the Go To Queue button will display. This will have a summary of the records that you were attempting to import.
Inspect Queue #
If you are accessing the queue following an upload, your current queue will open upon clicking Go To Queue. If you access your queue at a later time due to the number of records being imported, when you click on Inspect Queue, a list of your queues will appear. Double click on the queue you wish to open.

TIP: If the batch you want to view does not appear on the list, close the Batch Loader and re-open it. If it still does not appear you will need to re-load the batch.
From here you can see your queue’s summary, the list of records that were in your uploaded file, and a number of actions to perform.

The Queue Summary will tell you how many records are in the queue, how many records have been imported, and if there are any failures. If you imported your holdings along with the records, that information is visible as well.

You can filter the records that are displayed to only display records with matches in the catalog, records that were not imported, or records with import errors. Click the appropriate box to filter in these ways.

If any of the records you are importing have matching points which collide with records in the system, then a link will be displayed in the Matches column.

Clicking on one of the blue numbers in the Matches column will take you to a page which displays a summary of information about the record. This is a record that already had a match in Evergreen, so did not load. It displays the matching Evergreen record database ID in the Record ID field.

You can also compare the MARC for each record by clicking on Queued Record MARC for the record in your queue, and Edit Record for the record already in the catalog.

Clicking on the link in the Record ID field will take you to the title’s Bibliographic record
If you want to return to the queue from this screen, you can click the Return to Queue button.

If you click on one of the links for a record that loaded (meaning it had no matches already in Evergreen), you will be taken to this screen:

You can view the MARC record here, but currently the option to edit the MARC record on this screen is not functioning. If you wish to review the new record in the catalog you may open a new tab and do a catalog search.
TIP: When searching for the record in the catalog, to find them more easily, you can limit your search to your local library. It will include the new records since they have no holdings yet.
Queue Actions #
In the upper right corner of the screen there is a Queue Actions box.

Clicking on Import Selected Records and Import All Records will take you to the Import screen of the Batch Loader. View Import Items will show you any items that were imported with the records in the queue.
***Export Non-Imported Records does not currently work reliably. Please see Bug 1833303 for more info***
Export Non-Imported Records will automatically create and download a Notepad file with the MARC records that were not imported into Evergreen. The system will name the file your queue name followed by _nonimported.
Clicking on Copy Queue to Bucket

Delete Queue will delete the queue you are viewing. This will not delete the records from the catalog if you’ve already imported them. The Queue is somewhat like a Bucket
To delete a queue, go to the Inspect Queue screen. Select the queue(s) you wish to delete. Click the Delete Selected button located on the left of the screen.

No dialog box will pop up confirming the deletion; the queue will be immediately deleted. The deleted queue will no longer appear in the Select or Create a Queue field.
You can also delete a queue from the Queue Actions box while viewing an individual queue. You will be asked to confirm queue deletion.

Other MARC Batch Import/Export Screens #
In addition to the default Import screen and the Inspect Queue screen, the Batch Loader has six other screens. These include Export, Record Display Attributes, Merge/Overlay Profiles, Record Match Sets, Holdings Import Profiles, and Recent Imports. Excluding Export and Recent Imports, the settings with the other menu options may be managed at the consortium level.
Export Queue #
The Export Records interface allows us to export bibliographic records using a CSV file, Record (Database) ID, or a Record Bucket
Recent Imports #
The Recent Imports screen displays queues you have recently uploaded to Evergreen based on the selected date.

The Show Sessions Since tool has a calendar to show sessions since the date you select. Note that the session name (“Morning load” circled above) can be set at the time of import. Otherwise a string of letters and numbers is assigned. If the Queue has been deleted, the screen will only tell you the status of the import (complete or active), not the name of the queue. Setting a session name at the time of import might be useful since the name of the queue is not shown after deletion. If the Queue has not been deleted, a link will appear to it, as circled above.
Importing Records with Attached Holdings #
When you load records to Evergreen Indiana by any method, always check the system first for existing records which match your items. Do not load duplicate records to the system.
To import records with holdings already attached, you must include holdings information in the 949 line of your MARC record. If you buy MARC records from a vendor, you can request that they include this information. If you use OCLC Connexion, or another piece of software that allows you to edit MARC records, you can add the 949 line yourself before importing the records to Evergreen Indiana.
The following format should be used:
| Copy information | Subfield | Format to enter data |
| owning_lib | a | Shortname of owning branch (example: STLIB-IND) |
| circ_lib | b | Shortname of circulating branch (example: STLIB-IND) |
| call_number | c | text string containing your call number label |
| copy_number | d | text string or integer |
| status | e | text string matching one of the copy status values |
| location | f | text string matching one of your Copy Locations |
| circulate | g | “t” or “f” boolean values |
| deposit | h | “t” or “f” boolean values |
| deposit_amount | i | text string (do not include the dollar sign) |
| ref | j | “t” or “f” boolean values |
| holdable | k | “t” or “f” boolean values |
| price | l | text string (do not include the dollar sign) |
| barcode | m | text string |
| circ_modifier | n | text string matching one of the circ |
| circ_as_type | o | text string corresponding to a MARC code (a, j, i, e, o, etc.) |
| alert_message | p | text string for staff Client Browser-based staff interfafce for the Evergreen Integrated Library System or Software (ISL).
alert |
| opac_visible | q | “t” or “f” boolean values |
| pub_note_title | r | text string |
| pub_note | s | text string |
| priv_note_title | t | text string |
| priv_note | u | text string |
Examples:
949 \\$aAPLSD$bAPLSD$cCDDAV$eInprocess$fAV$gt$hf$jf$kt$l19.99$m1234567891234$ncd-music$pPrivate alert message here$qt$rPublic$sPublic Note Here$tPrivateNote$uPrivate Note Here
You do not need to code the first or second indicator of the 949 field.
At a minimum, code subfields a, b, e, f, g, 652894
h, j, k, m, n, q
If you don’t code c, your item will have no call number, and if you don’t code f, your item will show a location of “Stacks.”
NOTE: You currently can’t set Hold A request placed by staff or patrons for materials to be picked up at a selected location (see Pickup Library).
If you have a batch of records set up with holdings data included in the 949 field, you can import the records. You will need to select Auto-Import Non-Colliding Records, and Import Attached Holdings. You will also select “OCLC Connexion Format (Indiana Custom) – 949” from the Holdings Import Profile.
Then choose either OCLC or System local from the Invisible w/o holdings choices.
NOTE: Invisible w/o holdings means the record would be invisible in the OPAC if no holdings were attached. It does not mean these import choices are only to be used if you are importing records without holdings.
Once you have made the appropriate selections, click the Upload record to load your records. If needed, see Importing Records via Batch for more detailed instructions about uploading records.
Your records should load into Evergreen Indiana with your holdings attached. Use the barcodes to check the records from the Item Status
