The Template Editor allows you to build new reports from scratch or update existing templates.
The template editor #
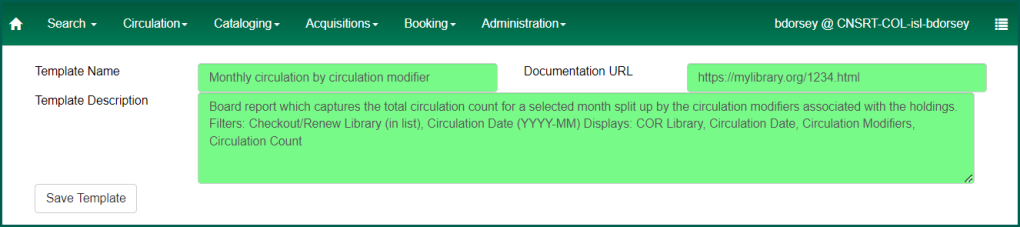
At the top of the editor, you will see fields to enter the name of the new template, a field to enter a documentation URL, and an optional field to describe what the template does. It also includes the Save Template button.

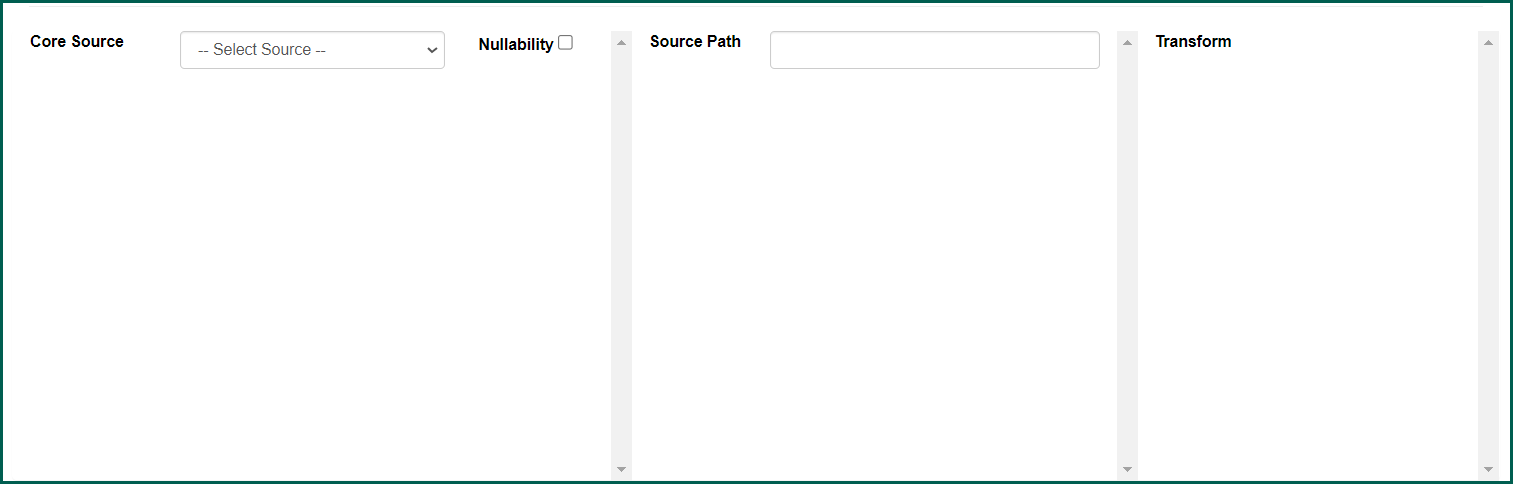
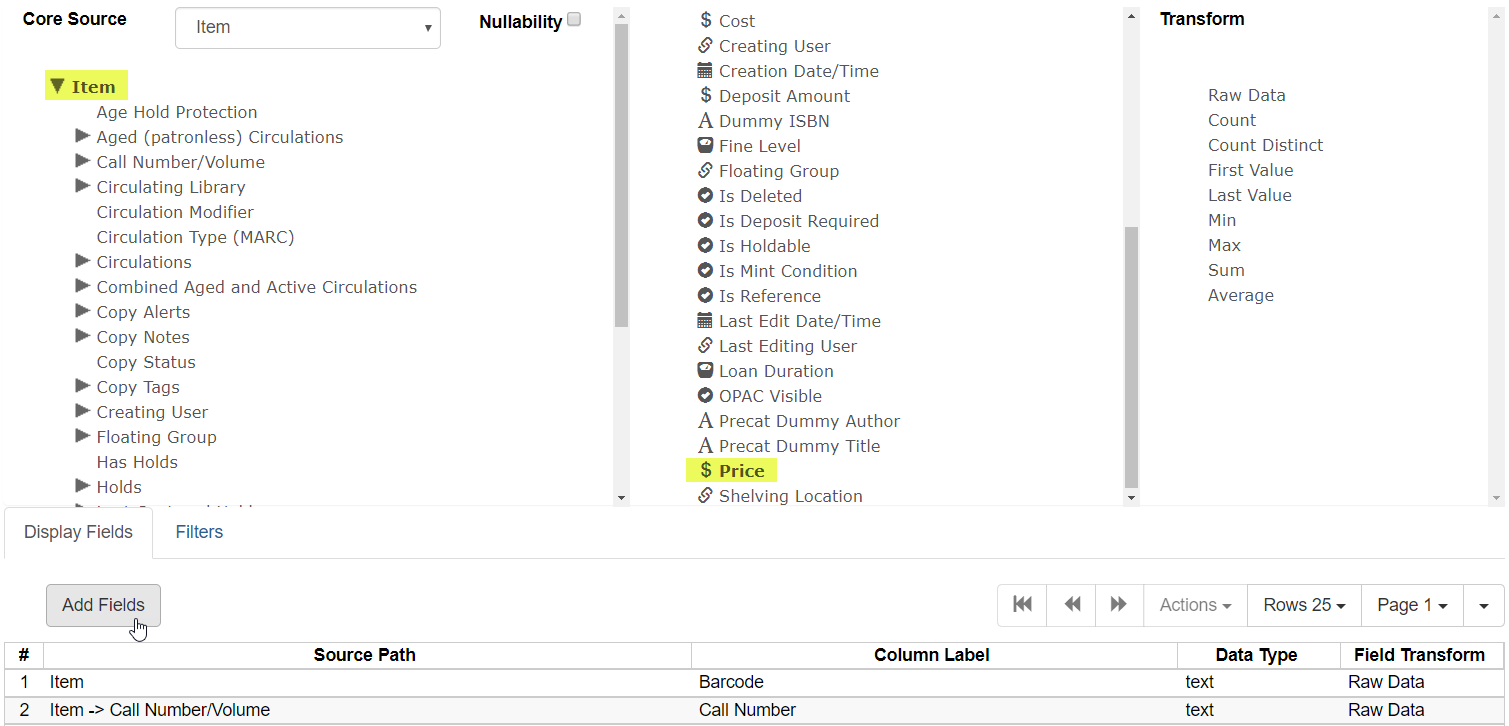
The center of the editor is where the source and subsources are selected.
The bottom of the editor reveals the tabs to switch between the Display and Filters fields. Selected sources appear in this grid.

Each of these elements will be reviewed in the subsequent sections.
Name, Description, and the Documentation Link #
The Name, Description, and Documentation link spaces should be filled in with sufficient data to ensure that future users of the template have enough information to determine if the template is a good fit for the desired dataset. You must enter content into the Name and Description fields. The URL field is optional, but supporting documentation is appreciated. Please note you cannot retroactively add URL documentation to an existing template without cloning a new copy.

Sources and Subsources #
Sources determine what sort of data can be accessed for a report. There are a small group of Core sources which are used as the primary access point for most reports. There are hundreds of sources total though, so you may need to try a couple of different sources to focus your template correctly.
NOTE: Sources may have varying names when they appear as a subsource.
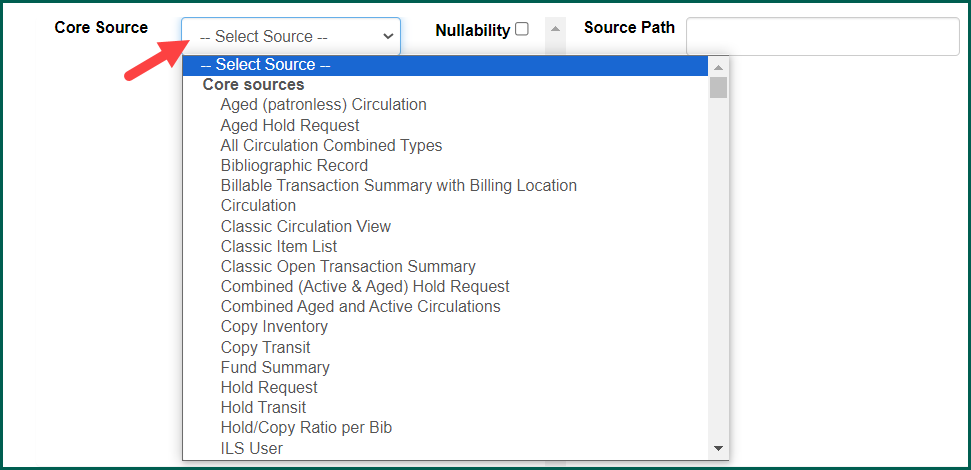
You must choose a primary source to begin building your template. Existing templates will have the primary source already selected when cloning.
Click on the Core Source drop down to select the most accurate source for your template.
Once selected, the primary source will appear in the upper left of the Source box.
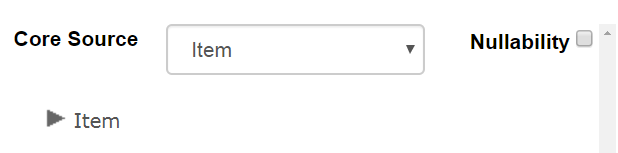
Clicking on the name of the source will open up the available links and data from that source in the Fields list. Clicking on the arrow next to the field name in the Source box will open up a tree of available subsources.
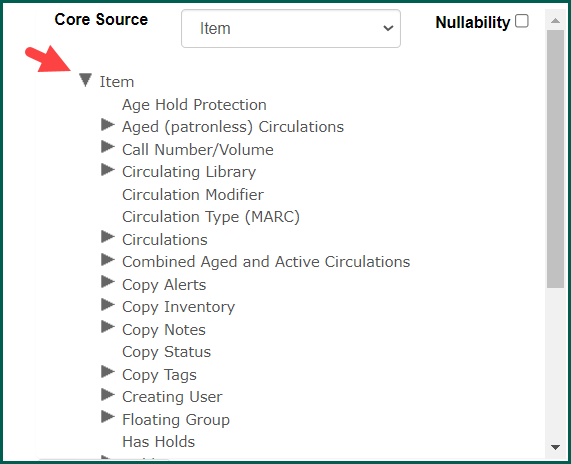
Clicking on the subsources’ arrows will open up the subsources available from that source.
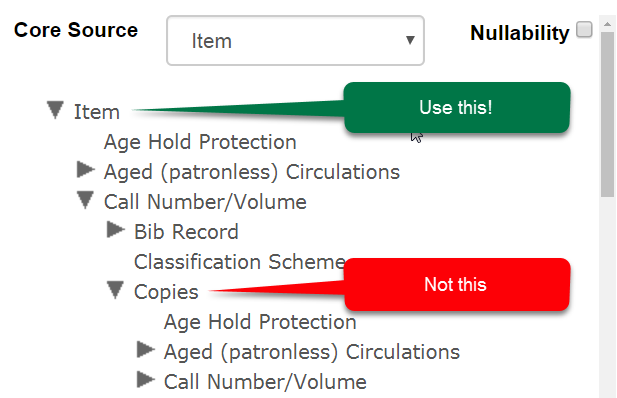
As much as possible be sure to stay as high up in the tree, a.k.a. as close to the primary source, in order for your report to be efficient. Looping through subsources can result in unnecessary complexity and even result in corrupt outputs.
Fields #
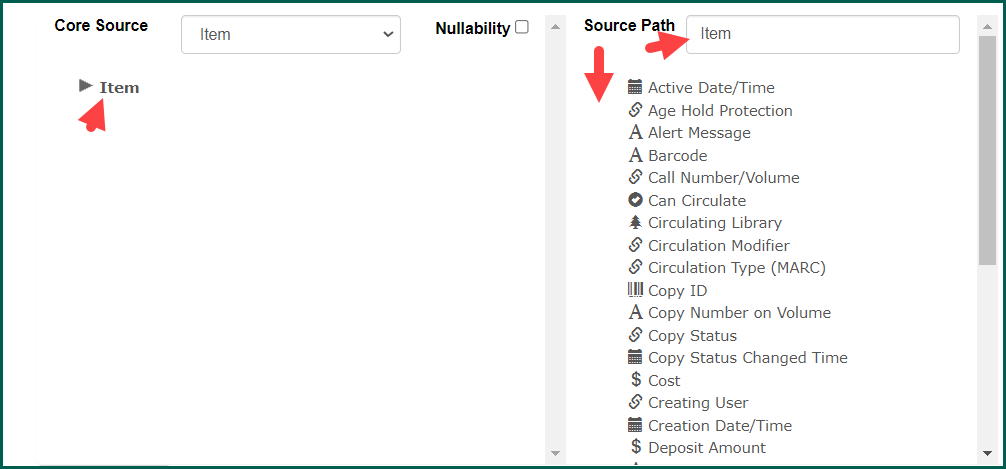
Fields are the terminal data entries found in each data source. Clicking on the name of a data source will cause the source name to display in the Source Path field and the available fields below that.
In the Client
| Icon | Type | Notes |
| Boolean | T/F; coded as 1 or 0 in outputs, entered as t or f when hard-coding template filter values. | |
| float | Number with a decimal value, aka floating point decima | |
| id | Unique identifier, typically the primary key | |
| integer | Whole number | |
| interval | Span of time, in Evergreen Indiana: hours, days, months, years | |
 | link | Indicates join with another data source. Do not use these entries as filters. Only recommended for use with outputs for the Circulation Modifier link entry. |
| money | Number with 2 decimal places fixed | |
| org_unit | Unique agency identifier | |
| text | String of text | |
| timestamp | Timestamp date/time inclusive. |
Names of field entries may vary from source to source!
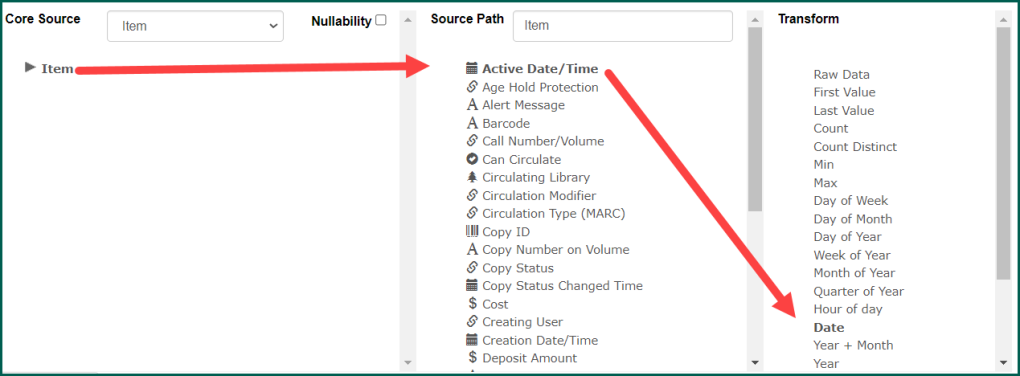
Transforms #
Transforms are a tool to refine how the raw data in the database is handled either when filtering or displaying; changes to the data can be cosmetic, evaluative, or directive. By default, any content will be presented in the raw data form unless a transform is applied.
| Transform | Description | Eligible Data Types |
| Raw Data | The data exactly as it appears in the source. | Any |
| Count | Counts the number of appearances of the selected data item in the query sources. Commonly used with IDs and org_units. | float, id, integer, money, org_unit, text, timestamp |
| Count Distinct | Counts the number of unique appearances of the selected data item in the query sources. Commonly used with IDs and org_units. Prevents count duplication. | float, id, integer, money, org_unit, text, timestamp |
| First Value | Lists the first entry located by the reporter from the eligible data. | float, id, integer, money, org_unit, text, timestamp |
| Last Value | Lists the final entry located by the reporter from the eligible data. | float, id, integer, money, org_unit, text, timestamp |
| Average | Lists the average of the values retrieved. | float, integer, money |
| Max | Finds the largest value of the eligible data. | float, id, integer, money, org_unit, text, timestamp |
| Min | Finds the lowest value of the eligible data. | float, id, integer, money, org_unit, text, timestamp |
| Round | Removes any trailing decimals. (Always rounds down.) | float, integer |
| Sum | Add up corresponding entries. | float, integer, money |
| Drop trailing decimals | Removes any values that appear after a decimal in the raw data | float |
| First 5 characters (for US ZIP code) | Removes all but the first 5 characters from the entry. | text |
| First contiguous non-space string | Removes any content that follows a space in the content. | text |
| Transform | Description | Eligible Data Types |
| Day of Week | Provides day of week, ignoring year; 0-6, where 0 = Monday and 6 = Sunday. | timestamp |
| Day of Month | Provides day of the month, ignoring year; 1-31. | timestamp |
| Day of Year | Provides day of the year, ignoring year; 1-365. | timestamp |
| Week of Year | Provides week of year, ignoring year; 1-52. | timestamp |
| Month of Year | Provides month of year, ignoring year; 1-12 | timestamp |
| Quarter of Year | Provides quarter of year, ignoring year; 1-4 | timestamp |
| Hour of day | Provides hour of day; 0-23 | timestamp |
| Date | Removes times from the timestamp ; YYYY-MM-DD | timestamp |
| Year + Month | Extracts only the year and month from the timestamp; YYYY-MM | timestamp |
| Year | Extracts only the year from the timestamp. | timestamp |
| Hour | Provides hour of day; 0-23 | timestamp |
| Day Name | Extracts the day of the week and provides the name of the day; Monday, Tuesday, Wednesday, etc. | timestamp |
| Month Name | Extracts the month of the year from the timestamp and provides the name of the month; May, April, June, etc. | timestamp |
| Age | Calculates the amount of time elapsed between the creation of the timestamp and the report being run. Presented as # years, # months, # days. | timestamp |
| Months ago | Calculates the amount of time elapsed between the creation of the timestamp and the report being run in months. | timestamp |
| Quarters ago | Calculates the amount of time elapsed between the creation of the timestamp and the report being run in quarters. | timestamp |
Transforms can be used to create complex filters or style your displayed outputs by grouping results, performing mathematical operations, or extracting elements of detailed fields. Only one transform may be applied to a field.
They can be applied when selecting your fields. Choose the transform you wish to apply for the selected field before adding the field to the editor.
Please note that transforms are sticky once selected here. Be sure to deselect the transform once you are finished with the selected field to prevent applying an ineligible transform to other fields.
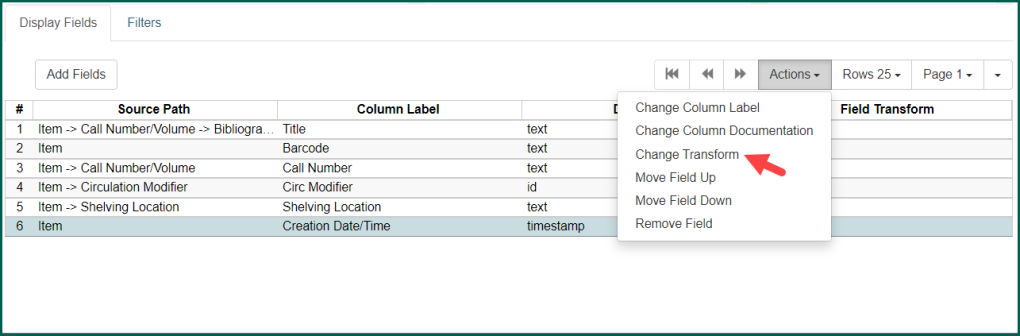
To reduce the chance of misapplying a transform, you may wish to apply them in the editor after the fields have been selected for the Display Fields and the Filters. To change a transform, select it from the column and click Change Transform by right-clicking on the source row or by selecting it from the Actions menu.
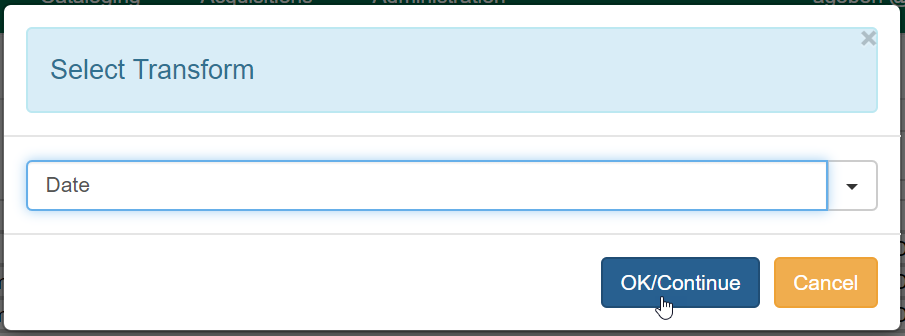
Select the transform you wish to apply.

Click OK/Continue to complete the change.
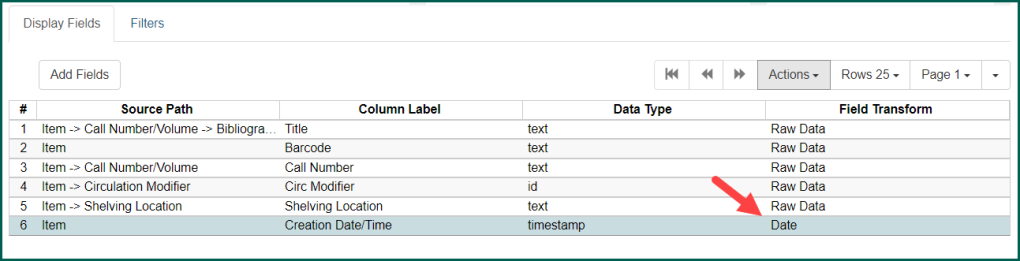
The field will be updated.
Filters #
Filters are used to define how results are limited. Any field can be used to filter the data in a source. If no filters are entered, then every entry in the selected source will be returned. Filters can be transformed to perform evaluations and calculations as part of the filtering process. Examples of a transformed filter include selecting only circulations from a selected year or filtering Patron
Displays #
Display Fields define what information is returned once the data has been filtered. Transforms are used heavily on display fields to enhance the presented data and reduce the amount of post-processing that needs to be done. Examples include counting circulations to present them according to circulation modifier or cardholder type rather than listing every single circulation separately or summing up transactional balances to get balances for cardholder accounts.
Building a basic template #
Plan your report #
When you start to write a new report, it’s important to know exactly what information you are hoping to obtain. Begin by asking the 5 Ws:
- Who : What libraries, staff, collections, bills, or patrons need to be considered?
- What : Should the main output data be lists, counts, sums, or balances?
- When : Does the report need time/date constraints or is it a snapshot report? Will it be used on a recurring basis or on demand?
- Where : Do workstations, branches, or shelving locations play a role?
- Why : Is this report template for a single specific use or can it be made flexible so it can be used for other, similar scenarios?
Choosing your source #
Choosing the source for your template is the first major step. You must choose a source that contains the data you wish to report on. In other words, if you try to create a report to list materials that have never circulated, using the Circulations source would be fruitless, because none of the items ever appear in that source. The Items source, however, will have all of the information on both items that have and haven’t circulated, so you want to start there.
There are nearly 500 potential sources to use when building templates, but most templates start with one of the core sources, of which there are less than 50. The following are most recommended:
| Source | Notes |
| All Circulation Combined Types | This slow running source provides total circulation counts across all 4 types of circulation: traditional, in-house use, non-cataloged, and non-cataloged in-house use. No item, bib, or Patron Cardholder with an Evergreen Indiana account.
See also: user, customer, etc.
information is available with this source. |
| Bibliographic record The record that contains data about a work, such as title, author and copyright date. A bibliographic record may have zero or more item attached, which are the things that (may) circulate.
| Use this source to pull information from the Bibliographic record The record that contains data about a work, such as title, author and copyright date. A bibliographic record may have zero or more item attached, which are the things that (may) circulate.
. Most commonly used for catalog cleanup efforts. |
| Billable transaction summary with billing location | Use this to get data on bills. Results should be returned as individual transactions or may result in duplicate entries. |
| Combined Aged and Active circulations | Use this source for almost any traditional circulation report, including remote circulation. |
| Combined Aged and Active Hold A request placed by staff or patrons for materials to be picked up at a selected location (see Pickup Library). | Use this source for holds reports. Do not use for Transit Material shipped between Evergreen Indiana libraries. |
| ILS User | Use for reports on Patron Cardholder with an Evergreen Indiana account.
See also: user, customer, etc.
and staff accounts not related to circulation or holdings. |
| In House Use | Use for in-house use reports. |
| Inter-system Copy Transit Material shipped between Evergreen Indiana libraries. | Use for Transit Material shipped between Evergreen Indiana libraries. |
| Item | Use for all holdings reports, including weeding, inventory, and housekeeping. |
| Non-cataloged Circulation | Use for non-cataloged circulation reports. |
| Non-cataloged In House Use | Use for non-cataloged in-house use reports. |
| Payments : All | Use for reports relating to collected funds. |
Building Filters #
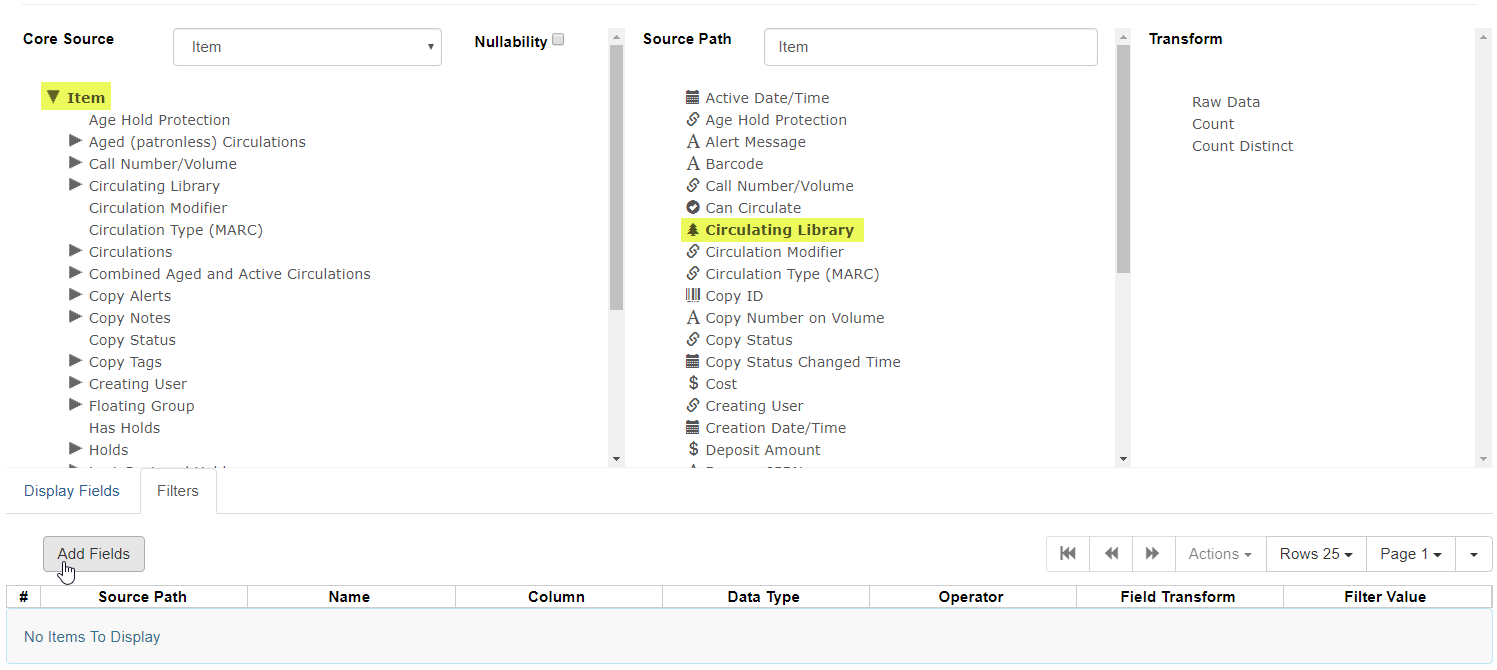
Add fields from the chosen source and subsources by clicking on the field(s) in the Fields box and then the Add Fields button while the Filters tab of the editor is selected. Note that you can only select fields from one source at a time.
In this example, the Circulating Library
If you need to remove a filter that’s already been added to the editor grid, select the filter row. Right-click or use the Actions menu to select Remove Field.

Operators #
By default all filters allow a single, exactly matching entry then when the report is run. That is frequently insufficient for a well rounded report. Operators allow you to adjust what sort and scope of inputs will be allowed for filters.
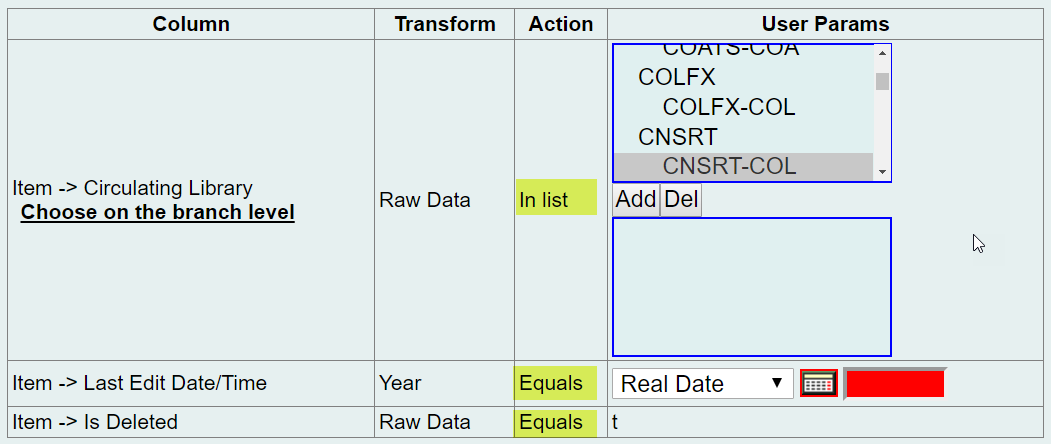
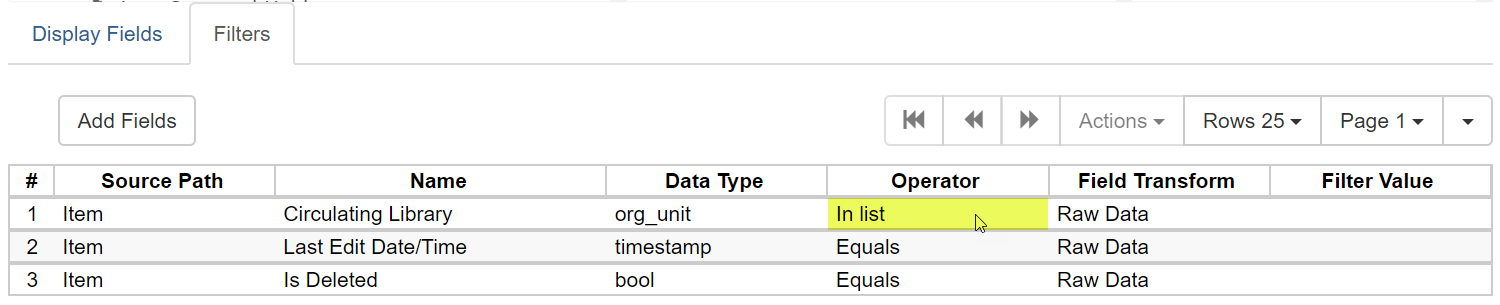
In this example, the timestamp and deletion status are showing the default operator, but the Circulating Library
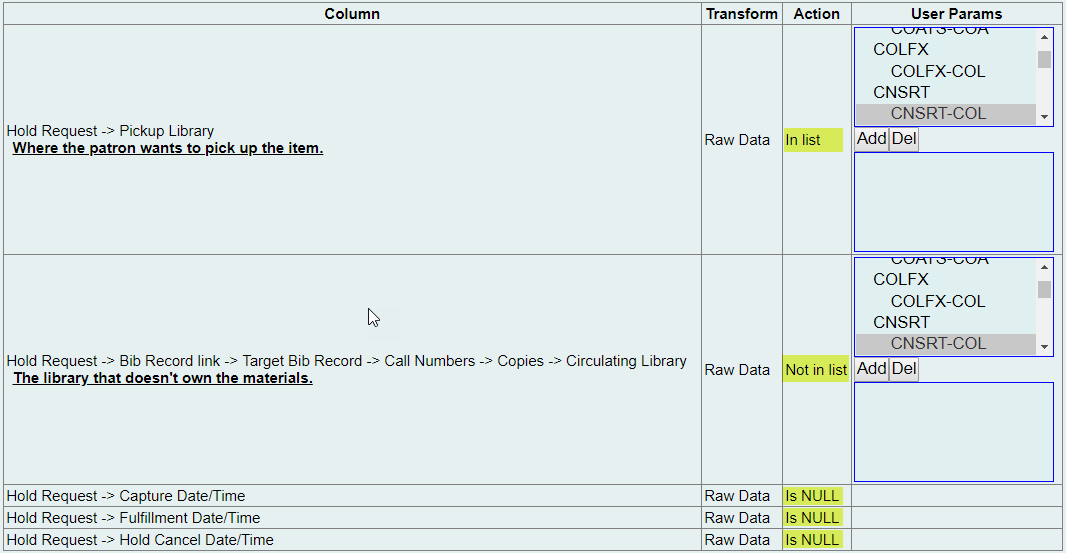
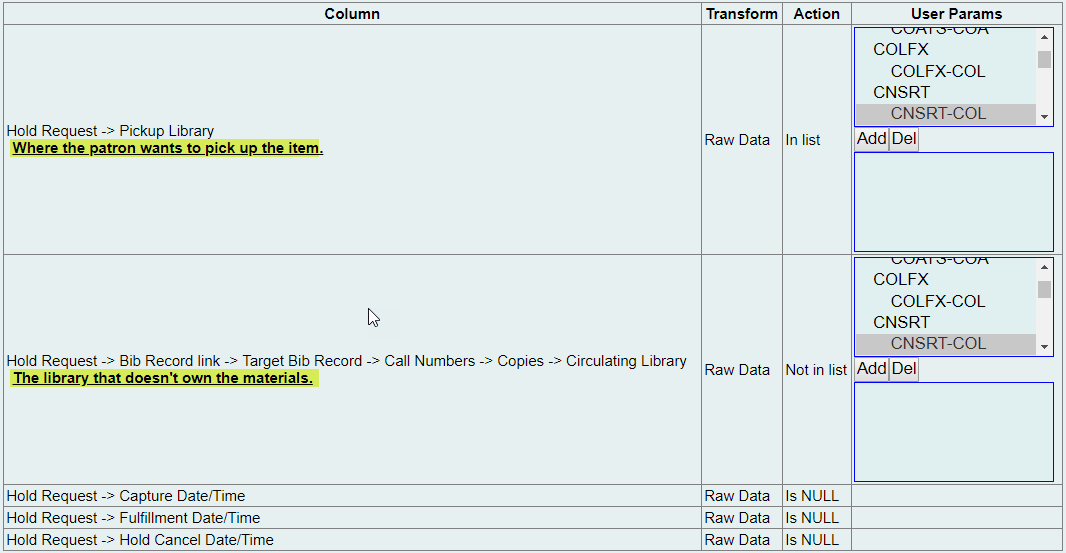
In this example, null operators are used to exclude any requests that were reviewed for inclusion, and a combination of list operators sets library eligibility.
| Operator | Description | Notes |
| Equals | The default which requires an exact single match of the entered filter value. | |
| Contains Matching substring | Looks for textual substrings to match on. | Only one substring allowed ; text only. Case matters. |
| Contains Matching substring (ignore case) | Looks for textual substrings to match on. | Only one substring allowed ; text only. Ignores case. |
| Greater than | Any entry selected has a value greater than the filter value. | Alphanumeric ; not inclusive. |
| Greater than or equal to | Any entry selected has a value greater than or equal to the filter value. | Alphanumeric ; inclusive. |
| Less than | Any entry selected has a value less than the filter value. | Alphanumeric ; not inclusive. |
| Less than or equal to | Any entry selected has a value less than or equal to the filter value. | Alphanumeric ; inclusive. |
| In list | Allows for the entry of multiple exact match entries for inclusion. | Recommended with ID type filters |
| Not in list | Allows for the entry of multiple exact match entries for exclusion. | Recommended with ID type filters |
| Between | Allows for the entry of a starting and ending value between which defines the match for inclusion. | Alphanumeric ; inclusive. |
| Not between | Allows for the entry of a starting and ending value between which defines the match for exclusion. | Alphanumeric ; inclusive. |
| Is NULL | Only matches on empty data. | |
| Is not NULL | Only matches on data with values. | |
| Is NULL or Blank | Only matches on empty or intentionally blank data. | Will not work with timestamps |
| Is not NULL or Blank | Only matches on data with values that are not empty or blank. | Will not work with timestamps |
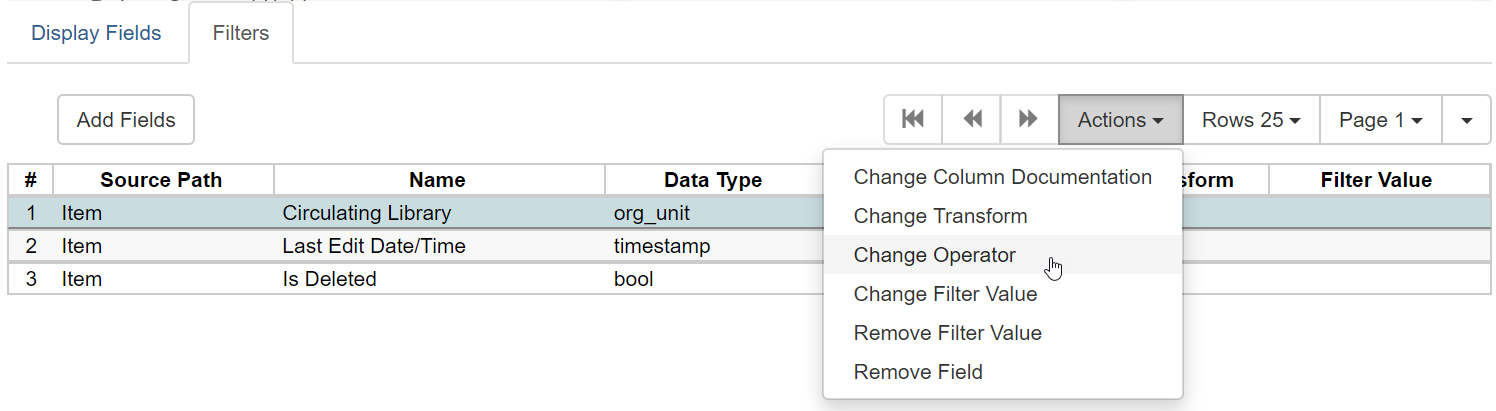
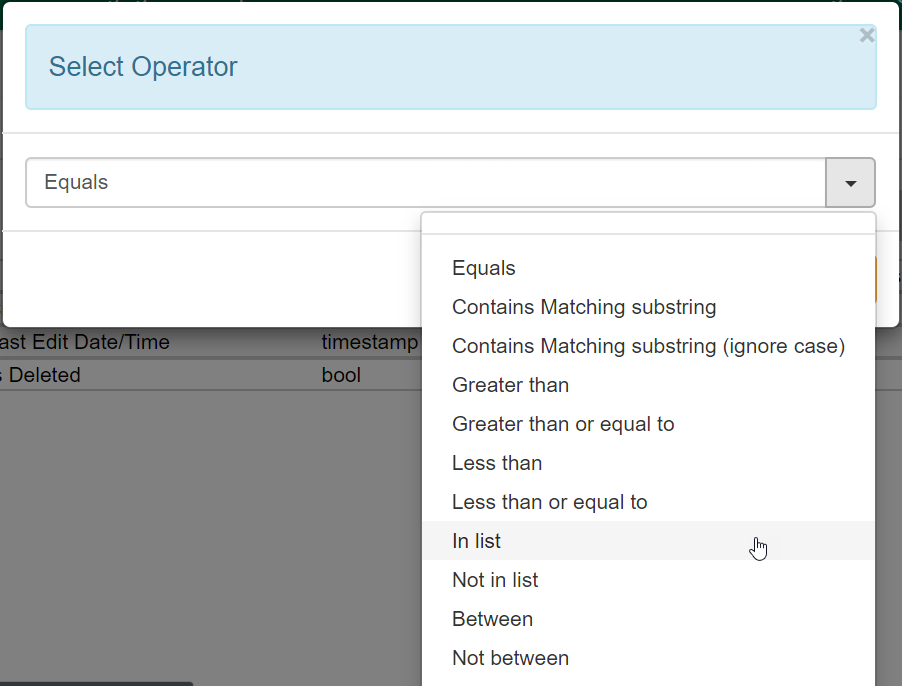
To set an operator, choose the filter you wish to update in the editor grid. Right-click or open the Actions menu and select Change Operator.
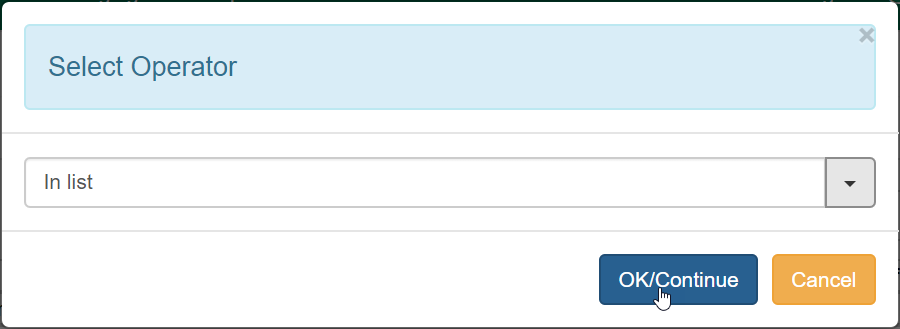
Choose the preferred operator from the dropdown list.
Ok the selection and the filter will be updated.
Filter Values #
When setting up your filters, it is possible to preset some values so that the template can be used consistently. In Evergreen Indiana, we use them mostly for presetting boolean values, but any inflexible filter value entry can be preset.
Note that as of 3.2, only a single entry may be hard-coded for any filter.
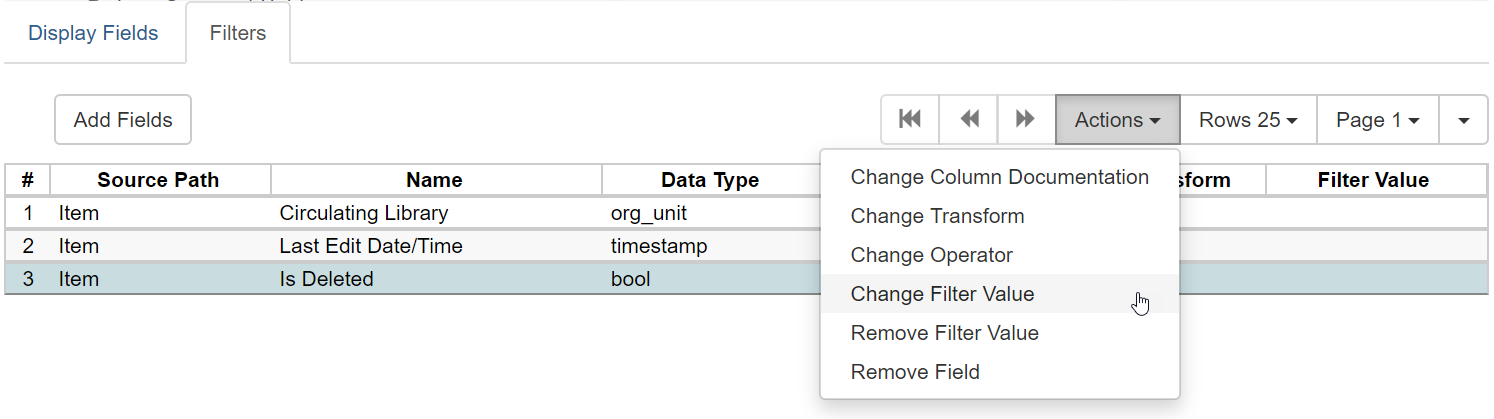
To set a fixed value for a filter, select the row of the filter in the editor grid, and either right-click or use the Actions menu to select Change Filter Value.
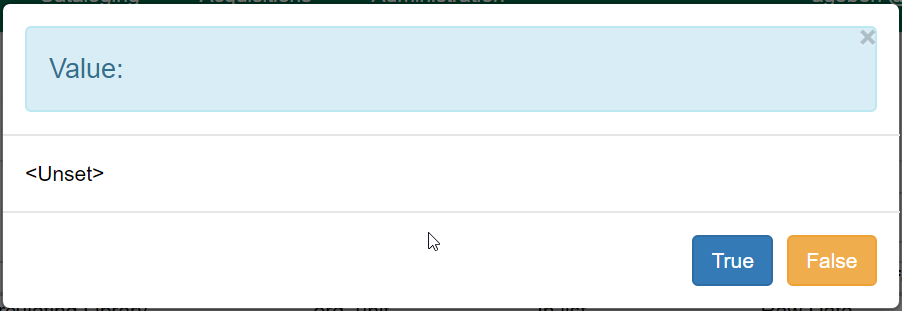
Booleans will offer a True/False button option to set.
Other data types offer a text box to enter your value. Click OK/Continue or Cancel.

Once entered and confirmed, the filter value will appear in the grid.

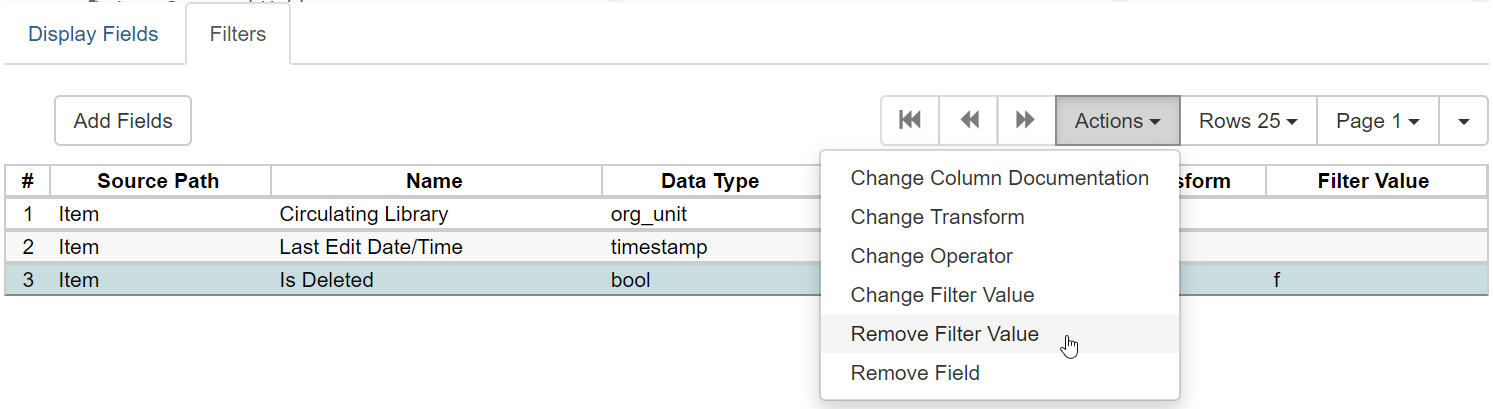
If you need to remove a preentered filter value, use the Remove Filter Value option in the Actions menu.
Filter Column Documentation #
Historically referred to as filter hints, you can provide template users with guidance on how to fill in a template.
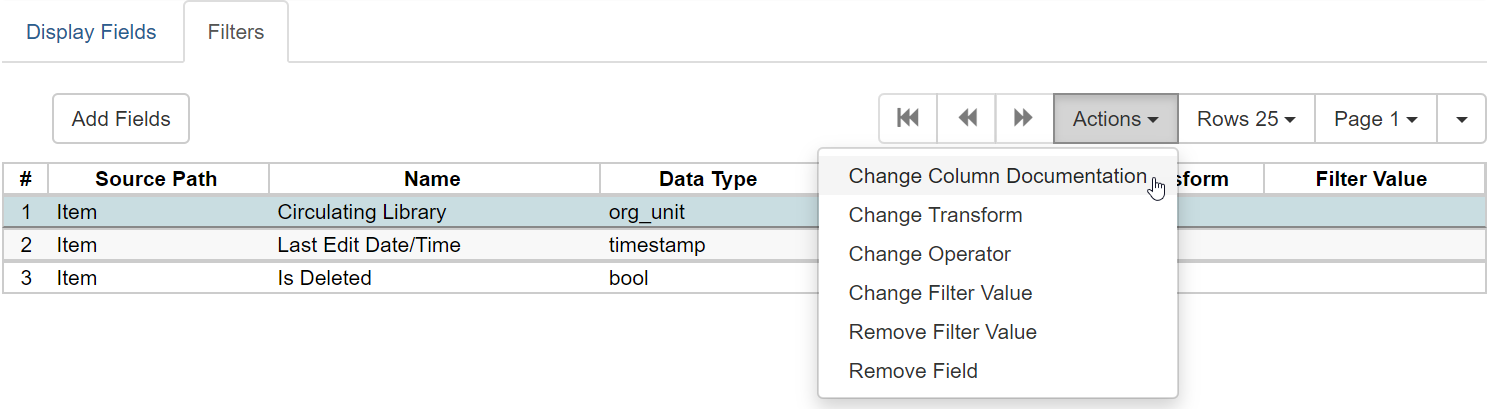
To add this information to your template, select the filter to which you wish to add a documentation hint. Right-click or use the Actions menu to select Change Column Documentation.

The hint/documentation information does not currently appear in the editor’s filter grid.
Building Displays #
Add fields from the chosen source and subsources by clicking on the field and then the Add Fields button while the Display Fields tab of the editor is selected.
Field names are frequently duplicated across sources, are non-specific, or are otherwise not clear. To update a field label so that it’s useful in the outputs, select the field you wish to relabel. Right-click or use the Actions menu to select Change Column Label.

Enter the preferred label.
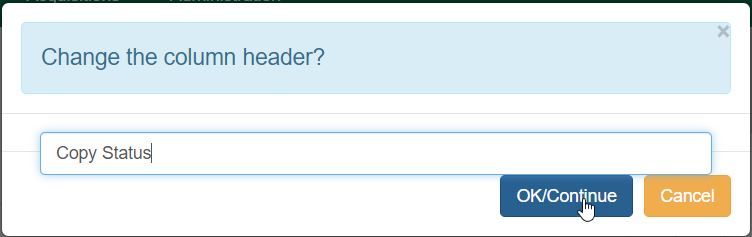
The grid will update with the new label, which will then be used in the outputs.
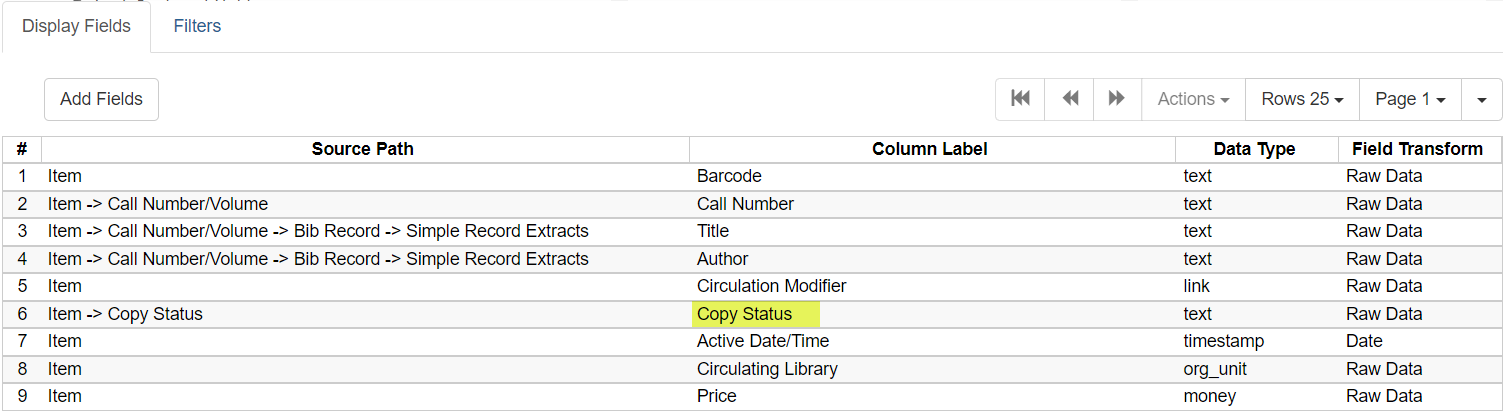
Displays will appear in the outputs left to right from top to bottom of the editor grid. In other words, the top entry (Item : Barcode) in the above grid will appear as the left-most column in the output. To move entries around in the grid, and so back and forth in the outputs, select the field you wish to move and use the Actions menu to move the entry up or down.

To remove a display field, select the field row. Right-click or use the Actions menu and choose Remove Field. This will cause the grid to resort in reverse order, so use with caution.
Testing a new template #
When you build a new template or update an existing template, be sure to test the template to ensure it’s performing as expected. This is most easily done if you have definite results that you are expected and can confirm independently. Check specific holdings, patrons, or shelving locations to confirm that they appear when they should. Template writing is rarely perfect on the first draft, so testing is a critical part of ensuring you can rely on that template going forward!
Building a complex template #
Aggregate filters #
Aggregate filters allow you to set complex filters in place. Examples of aggregate filters include selecting only items with fewer than # count of circulations or only patrons owing more than $#.##.
To create an aggregate filter, use a combination of a modifying transform and an operator.

In this example, the filter requires that the circulations be counted (by ID) by the field transform before selecting the data. Then the operator requires that whatever value is entered in the report filter is the minimum acceptable value for any records that are returned in the output.
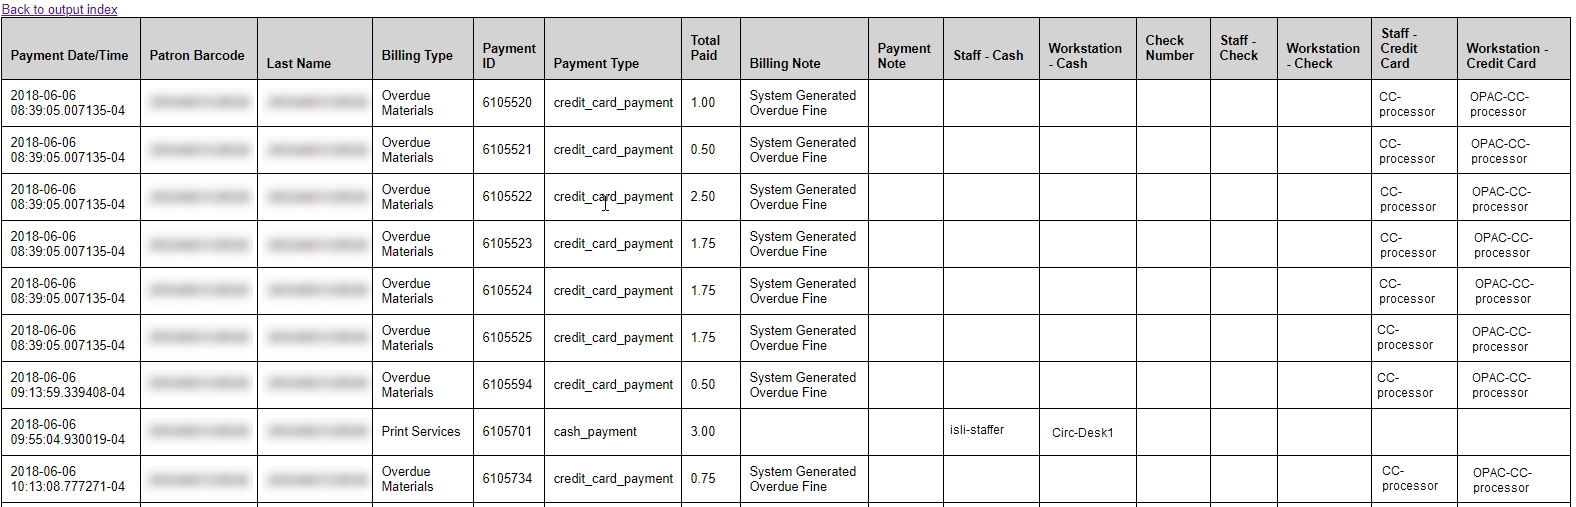
Using nullability #
The nullability setting allows you to alter the existing joins between the sources in order to pull data that does not appear in both reference sources. Nullability joins may either be left joined (Parent) or right joined (Child). Nullability joins prevent data from being excluded simply because it only appears in one of the sources selected. (Joins review – W3C)
An example of reports with nullability turned on is the Daily Fiscal Review, where only one form of payment is reported at a time. Note the gaps in the output where specific payment types were not used:
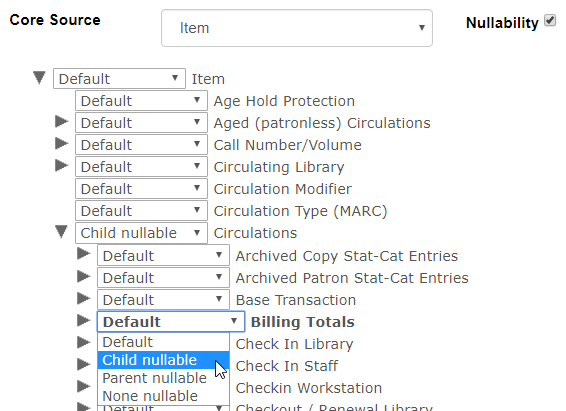
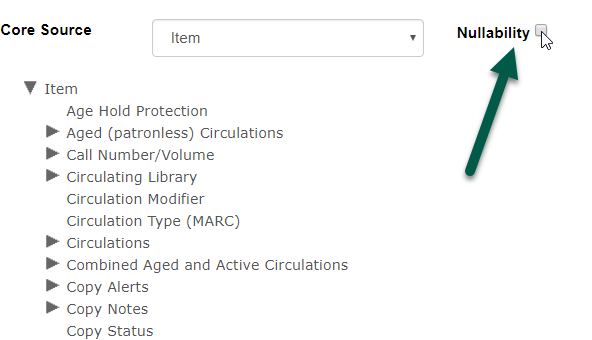
To enable nullability reporting, click in the box in the Core Source portion of the editor.
That will open up the nullable join selectors for each source and subsource.
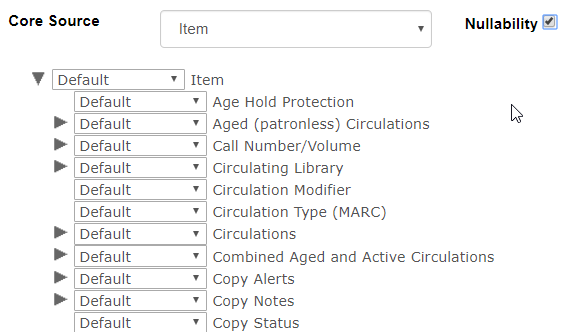
For each source that you wish to change the join on, choose the preferred join type from the dropdown.

Keep in mind that subsources of subsources may also required nullable joins to be set in order for all of the desired information to be retrieved.